
How to Do the Reverse-Grip Bent-Over Row to Build a Strong, Muscular Back
How do you develop killer lats? First, you need to do lat pulldowns. Then you need to do pull-ups. After you’re done with that, try some rows, and then finish off with some pullovers. Or… you could just perform the reverse-grip bent-over row and get nearly the same results as combining a series of back-focused exercises.
Efficient programming and exercise choice can drastically improve the quality of your back workouts. Follow these steps to learn how to perform the reverse-grip bent-over row, and how you should incorporate it into your routine to make the most out of your back day.
How to Do the Reverse-Grip Bent-Over Row Step By Step
Approaching the reverse-grip bent-over row for the first time doesn’t need to be an intimidating experience. Follow these steps for a picture-perfect lift.
Step 1 — Setting Up
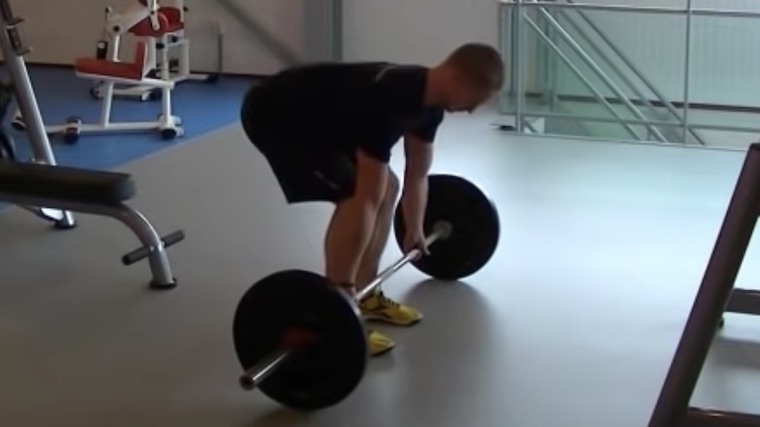
When you initially approach the bar, setting up for the reverse-grip bent-over row feels a bit like setting up for a deadlift. With the barbell over your midfoot, grab the bar slightly outside shoulder-width, using a double-underhand (supinated) grip — this is the “reverse grip” compared to the double-overhand (pronated) grip of the standard barbell row.
Brace your core, keep your spine neutral (not rounded or excessively arched), and drive through your feet to lift the weight off the floor.
Form Tip: Experiment with your grip width to see what results in feeling the highest degree of lat (back) activation. Most likely, setting up with your grip just past shoulder width apart will yield the best results. But depending on your limb and torso length, you may feel more comfortable slightly closer or wider.
Step 2 — Find Your Trunk Angle and Brace Your Core
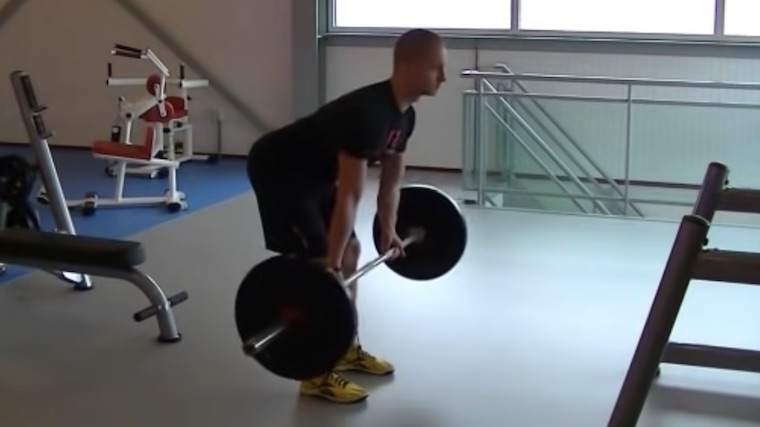
Hinge forward at your hips and stop when your trunk is pitched at roughly a 45-degree angle. Bend your knees slightly and maintain that angle throughout the movement. Keep your arms straight and allow the barbell to shift slightly forward. Take a deep breath and brace your core as you prepare to perform the row.
Form Tip: Consistency is key. Keep your arms at a dead-hang while you set up. This will reinforce the position you want to hold at the beginning and end of each rep.
Step 3 — Pull From Your Elbows
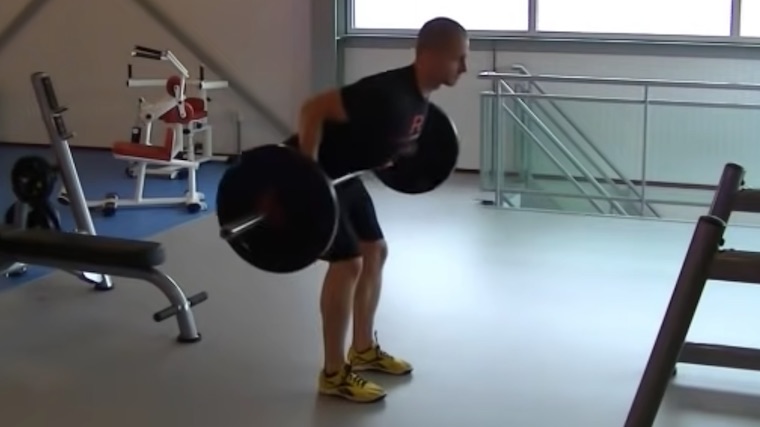
Squeeze and depress your scapula (pull your shoulder blades together and “down” toward your tailbone), then pull your elbows back. As you lift the weight, consciously engage your back muscles before you contract your biceps.
Continue pulling the weight toward your trunk until the barbell makes contact with your torso. To specifically target your lats rather than your upper back muscles, make the bar contact closer to your belly button than your sternum.
Form Tip: Don’t be concerned if your bar path isn’t a perfectly straight line. Pulling towards your belly button may feel awkward at first, but you should quickly notice increased lat activation when lifting this way.
Step 4 — Lower the Weight
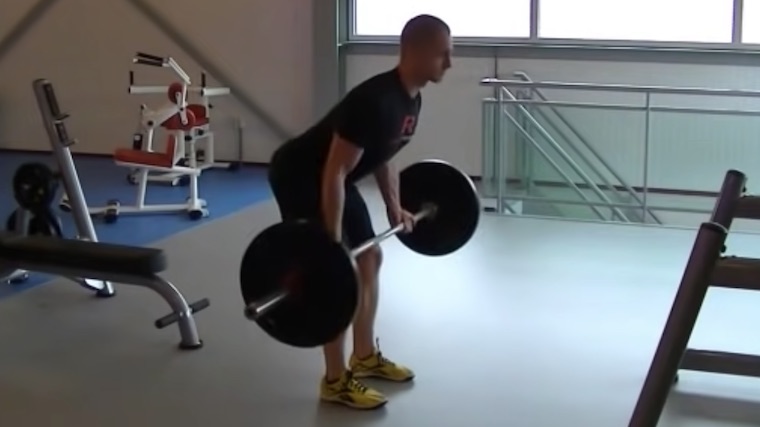
Squeeze your back muscles at the top of the lift and consider holding the weight there for a moment. Keeping your back flat and your core tight, lower the weight back to the stretched position until your arms are fully extended.
Maintain the forward hinge position throughout the entire set. To perform the next repetition, pull the barbell toward your belly button again.
Form Tip: Keep the movement relatively slow and controlled. This helps to avoid using momentum from one repetition to another to lift the weight.
Reverse-Grip Bent-Over Row Mistakes to Avoid
If you have a passing familiarity with the traditional bent-over row, or hinge movements as a whole, you could probably jump right into using the reverse-grip bent-over row to build your back and biceps without thinking too hard about form. Nevertheless, slipshod technique could mean you’re leaving gains on the table, or even putting yourself at an increased risk of injury.
Setting Up With a High Torso Angle
Either tight hips and hamstrings, a weak core, or a combination of the two could make it difficult for you to hold your trunk at a 45-degree angle across an entire set of rows. As a result, you could end up performing more of an upright row than you intend.

Setting up with a higher torso angle can result in increased muscular activation in your trapezius and your rhomboids, which means less isolation for your lats.
Avoid it: When you setup to perform the row, be sure to hinge forward and shoot your hips back to create a strong pulling position. Add hinge movements like the deadlift, Romanian deadlift, and the good morning into your training plan to develop greater levels of strength, balance, and mobility. This will help you build the strength needed to maintain the angle in your torso for your entire set.
Lower Back Rounding
For your spinal health and your longevity in the gym, for goodness sake, keep a flat back whenever you perform hinge movements like the row. While lower back rounding may be the result of a lack of mobility, you could also experience this just by going too heavy.

Avoid it: If you find your lower back rounding while you perform the reverse-grip bent-over row, set your ego aside. Either practice hinge movements until you’re capable of maintaining an isometric hinge or reduce the weights significantly and start over.
Engaging Your Biceps First
Since your biceps are a wrist supinator — responsible for turning your hand into a palm-up position — they engage the moment you “reverse” your grip on a bent-over row. In addition to being a secondary mover to perform the exercise, they also stabilize your elbow.
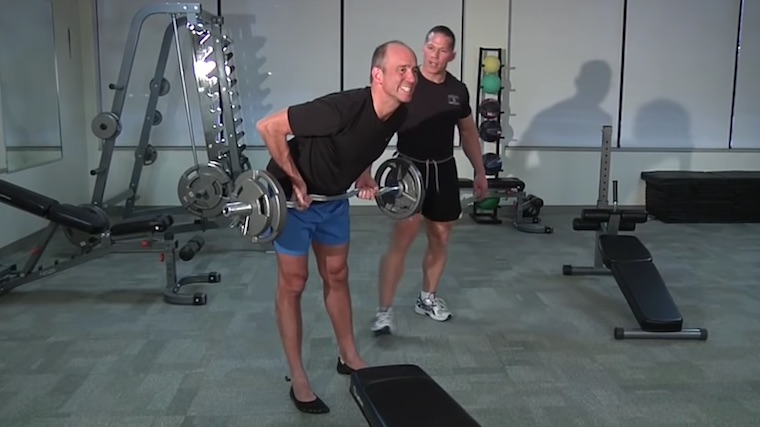
But your biceps should not be the primary mover in the reverse-grip bent-over row. That job falls to your lats, and trying to use your biceps to lift heavy loads meant for your lats might not end well for the much smaller biceps muscle.
Avoid it: Consciously think about pulling your shoulders back to engage your back muscles before pulling with your elbows. Don’t try to curl the bar to move the weight.
Utilizing Momentum From Rep to Rep
If you fail to maintain a consistent angle in your torso across each repetition, you might be generating momentum with your hips that decreases the load on your lats and biceps. This can be a sign of going too heavy, but you might also be doing this for ego lifting or simply because you’re not paying attention.
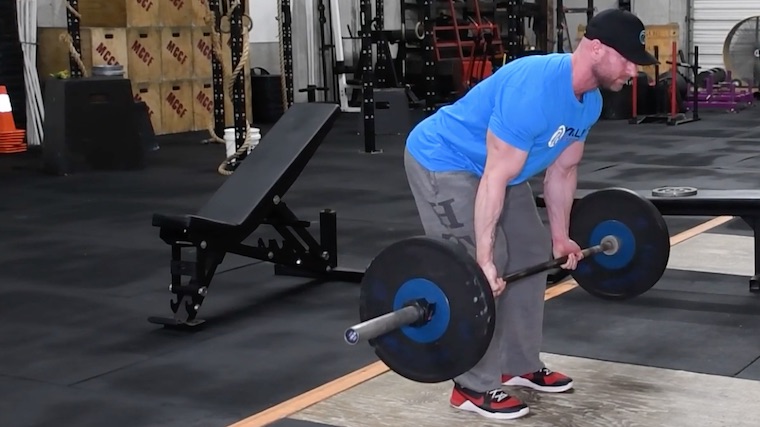
Avoid it: If the weight is too heavy for you to keep under control, lower it. Otherwise, consider focusing on the eccentric (lowering) portion of the lift to guarantee you keep the weight moving in a slow and controlled fashion to prevent momentum from building.
How to Progress the Reverse-Grip Bent-Over Row
If you have trouble performing the reverse-grip bent-over row right off the bat, here’s how you can approach it as a beginner and how to increase the difficulty as you continue to get stronger and progress in the gym.
Yates Row
The Yates row is the cousin of the reverse-grip bent-over row, the difference between the two being the angle of your torso. While you perform a reverse-grip bent-over row with your torso at roughly a 45-degree angle, the Yates row is performed from a more upright position.
The resulting lift targets your rhomboids and your traps in addition to your lats and biceps. It may not be as good of a lat builder, but it makes up for it by hitting your entire back. What was a “mistake” for the reverse-grip row can be used deliberately for a strategic purpose.
As you develop strength performing the Yates Row, you can slowly transition towards the reverse-grip bent-over row by experimenting with your torso angle. Sinking deeper into the hinge position will let you feel your lats working harder as you get closer to the 45-degree angle.
Add Isometric Holds or Timed Eccentrics
At a certain point, implementing basic linear progression — adding more repetitions or more weight — stops being as useful for lifts like the reverse-grip bent-over row. Rather than continuously increasing the load on the bar, which can eventually create a higher risk than reward and may decrease stress on the target muscle, you can add isometric holds or timed eccentrics.
With isometrics, squeeze your back and shoulders at the top of each repetition for one, two, or even three seconds while the bar is in contact with your abdomen. For timed eccentrics, focus on making the negative (lowering) phase of each rep take two, three, or four full seconds. This can help to maximize your gains and develop your mind-muscle connection.
Reverse-Grip Pendlay Row
If you’re looking to add an extra level of difficulty, swap out the reverse-grip bent-over row for a reverse-grip pendlay row. Since each rep starts and finishes on the ground, there’s no way for you to build momentum from rep to rep, which makes it a great lift to isolate your muscles and focus on pure pulling strength.
The reverse-grip pendlay row requires more hamstring flexibility than the reverse-grip bent-over row, because you’re in a steep forward-leaning position. However, it’s relatively easier on your core and lower back since you don’t have to hold an isometric hinge for the duration of your set.
Benefits of the Reverse-Grip Bent-Over Row
When you step into the gym, you come face-to-face with a wide range of tools and movements that you can use to sculpt your biceps and your lats. Here are some of the unique benefits of the reverse-grip bent-over row that make it worth adding to your routine.
Increased Lat Activation
Switching from a pronated grip to a supinated grip puts your arms and shoulders into a different position and changes the pulling angle, which is why it’s easier to draw the weight closer to your belly button than your sternum. This results in increased lat activation when compared to the traditional bent-over row.
Additionally, your rhomboids and traps play much less of a role in the reverse-grip bent-over row than they do when you perform the lift with an overhand grip.
Improved Balance and Core Strength
Holding an isometric hinge isn’t easy. Your core muscles work overtime to maintain a consistent angle under heavy loads. Simultaneously, your hamstrings stay active and engaged at a lengthened position, which can help build strength in your posterior chain while also improving your overall mobility.
Unparalleled Rowing Strength
The reverse-grip bent-over row cuts down on a number of variables and limiting factors posed by many other row variations. Generally speaking, you can lift heavier loads with a barbell than you can with a dumbbell.
Flipping your grip from overhand to underhand means your grip strength won’t hold you back as you increase loads over time because your wrists and forearms are in a stronger position. Finally, range of motion tends to be more efficient than with a traditional bent-over row, since you have improved leverage when tracking the bar closer to your center of gravity.
When you put all these factors together, what you get is a lift that lets you lift heavy weights with your lats, without so many of the variables that get in the way when performing other types of rows.
Muscles Worked by the Reverse-Grip Bent-Over Row
As a compound exercise, the reverse-grip bent-over row targets muscles across numerous joints. Here’s a list of the largest muscle groups worked by the lift.
Latissimus Dorsi
With some back exercises, you feel “your back” working. That’s not the case with the reverse-grip bent-over row. When performed correctly, you should be able to feel and, later specifically target, your lats in particular.
Your lats are the biggest muscle group in your upper body — running along each side of the back half of your torso. Your lats are also the primary muscle group working in the reverse-grip bent-over row. A rock-solid pair of lats make your upper body and shoulders appear broader and your waist look more narrow in comparison, which makes them an important part of developing an aesthetic physique.
Biceps
As secondary movers — muscles which assist the primary target muscles during a given exercise — your biceps and your brachialis muscles play two separate roles during the reverse-grip bent-over row. Since your biceps are a wrist supinator, they get direct stimulation to maintain the palm-up position during the lift. More importantly, they’re responsible for stabilizing your elbow during flexion to support the joint as the muscle contracts.
Abdominals
With a barbell held out in front of you and your torso held in an isometric hinge, your abs provide the strength and stability necessary to keep you from buckling over while performing the reverse-grip bent-over row. Especially as you get to heavier loads, you’ll find that your core plays a crucial role — keeping your torso held at the desired angle and stabilizing your spine to prevent rounding.
Hamstrings
As with any hinge movement, the reverse-grip bent-over row provides stimulus to your hamstrings. By developing strength in the fully lengthened (stretched) position, the exercise promotes muscular balance and flexibility in your hamstrings.
How to Program the Reverse-Grip Bent-Over Row
Building an effective training routine can be challenging. When you’re in the gym, you want to make the most of your time and energy to maximize your gains. If you’re not sure how to incorporate the reverse-grip bent-over row into your workout plan, here are a few options that you might consider.
As an Accessory for the Deadlift
For powerlifters, who specialize in performing the squat, bench press, and deadlift, finding efficient compound (multi-joint) exercises that complement your primary lifts can be a bit of a chore or simply confusing. The reverse-grip bent-over row builds strong lats while performing an isometric hinge, which can improve both strength and mobility across your posterior chain.
Following the deadlift, consider incorporating three to five sets of six reps, using a weight that lets you keep your torso angle solid across the length of the set.
As a Main Movement For Bodybuilders
In the interest of both exercise economy, and the hormonal response that compound movements provide, many bodybuilders prefer to start their workouts with heavy compound exercises before they get to their isolation movements. (1)(2) When you’re carving a statue from stone, use the dynamite before you get started with the hammer and chisel.
If your training split has a back and biceps day, the reverse-grip bent-over row lets you isolate your lats and warm-up your biceps, while also stimulating a hormonal response which may support muscle growth. Early in your workout, hit at least three sets of eight, focusing on the eccentric portion of the lift to maximize your hypertrophy gains. (3)
As a High Volume Accessory Lift
If you spend a significant amount of time in a squat rack or on a weight platform, adding the reverse-grip bent-over row as an accessory after the classic bent-over row can be as much about convenience as anything else. All you have to do is flip your wrists around and you have a lift that lets you engage and isolate your lats while also dialing in your rowing technique after the related muscles are thoroughly warmed up and pre-trained.
If you want to implement the reverse-grip bent-over row as a high volume accessory movement, consider performing three sets of 15 following other row variations.
Reverse-Grip Bent-Over Row Variations
Maybe you don’t have access to a barbell. Maybe you’re dealing with nagging shoulder or back pain. Maybe you just want to mix things up. Regardless of your reasons, here are a few different lifts that let you target your back like the reverse-grip bent-over row.
Seal Row
As with all chest-supported rows, the seal row provides unique stimulus by preventing you from developing momentum or engaging your hips. Unlike other chest-supported rows, you perform the seal row by lying face down on a flat bench.
The resulting lift can target your lats and your rhomboids without having to concern yourself with keeping a flat back. The full bench support also removes strain from the lower back and makes it virtually impossible to move the weight using momentum.
Single-Arm Dumbbell Row
Single-arm dumbbell rows are a relatively easy-to-learn introductory lift that keeps paying dividends as you grow in the gym. To get started, just kneel on a bench and row.
The single-arm row provides some advantages over barbell rows. Kneeling on a bench limits the amount of stress on your spine. Since the lift is performed one side at a time, you can isolate your lats and correct any muscular imbalances that may develop if you tend to exclusively use barbell row variations.
Inverted Row
Advanced pull-ups aren’t the only way to utilize your body weight for back-building. Inverted rows can be performed in a number of different ways — whether that be with suspension straps, on a Smith machine, a barbell set in a power rack, or any other stable surface that lets you get under it, and keeping your body in a straight line, pulling upwards.
To modulate the level of difficulty, simply increase or decrease the angle of your body relative to the floor. Either elevate your feet (for increased difficulty) or create a steep angle with an elevated upper body (to decrease the challenge).
Source: How to Do the Reverse-Grip Bent-Over Row to Build a Strong, Muscular Back
