Shoulder Mobility For Kettlebell Sport Athletes
Find out how to take care of your most complex series of joints to improve your lifting and overall shoulder health.
The shoulder joints are a complex, in both senses. They’re a physically complicated group of joints that, when healthy and acting together, make up the most marvellous, flexible, and sublime piece of natural architecture.
With the shoulder’s expansive range of motion comes opportunity for instability. [Photo credit: Andrew Bellamy]
The shoulder is also four separate and intimately associated joints: the gleno-humeral joint, the acromio-clavicular joint, the sterno-clavicular joint, and the scapula-thoracic joint. Inherently unstable, the shoulder allows us to be an incredibly effective animal, but at a cost.
When your knee swells from overtraining, you can strap it up and carry on. Your elbow, sprained from pitching or bowling too many times, is rigid, yet you can still reach out with your shoulder and the hand and wrist can manage to do their job. When your shoulder malfunctions, you cannot reach out and your arm feels monumentally heavy just inches away from your body. Your hand and elbow suddenly become much less effective than normal, despite being individually fine.
Why Shoulder Mobility Matters in Kettlebell Sport
For the kettlebell athlete, shoulder impingement of this kind restricts us from anything much more than swings, though gloved swings can at least maintain your grip and forearm training. The majority of the lifters I see are not yet suffering the shoulder problems of the older person such as arthritis or bony spurs. In the vast majority, kettlebell lifters’ problems are real sub-acromial impingement, or a pinching pain in the shoulder. Their injuries are often the result of poor postural habits and poor shoulder mobility.
There are many ways to increase shoulder mobility, but these are the central exercises and variations that I use and teach my clients.
Scapular Mobility
The acromio-clavicular joint (ACJ) is made up of the outer end of the collar bone and part of the shoulder blade, the acromion. The joint forms an arch that hangs above the gleno-humeral joint and allows the supraspinatus tendon to glide under it. By lifting your shoulder, the shoulder blade dips backwards, raising the ACJ. With rounded shoulder posture, weak rhomboids or short pecs, lifting the shoulder will not be easy. The tendon gets pinched as the space narrows, and this may lead to bursitis, tendinitis, or a cuff tear. If the shoulder blade doesn’t glide back and down, helping to raise the ACJ, then any athlete is less than efficient.
In order to gain optimal scapular mobility and efficiency, we need balanced and strong rhomboids, lats, and posterior cuff muscles, so that the humerus ‘hangs’ centrally in the joint. Weak posterior muscles tend to allow it to sag forwards, putting strain on the capsule and glenoid cartilage.
The Press-Up Plus
For scapular mobility a favourite exercise of mine is the Press-Up Plus, shown in the images below.
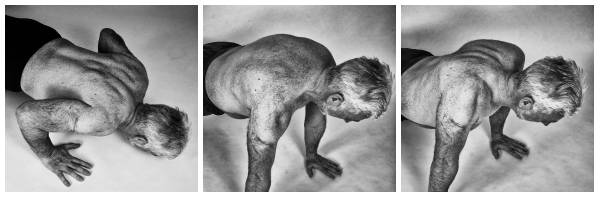
Note: If you can’t do a regular press-up, don’t try this yet. I don’t think this is very successful with knee press-ups, but start like that if in the early stage of rehab.
- Start in the regular press-up position.
- Maintain a really good frame and straight body. This is part of the tension that we need to create.
- Do a single press-up and push right up through the blades (middle image).
- Allow the body to lower (third image), and bring the blades together, making sure they are even.
- Monitor the differences between the two.
- Try to imagine crushing a walnut between your shoulder blades. Remember technique and an even squeeze is better than 25 poor reps cranked out.
- Repeat the cycle for 6-10 repetitions.
Thoracic Mobility
Good thoracic mobility is crucial in any overhead position, and is possibly the hardest physical adaptation to master in any sport. We need to work at it.
Squat with T-Band or Stick
For better thoracic mobility, I advise deep squats with an empty bar, stick, or T-band held overhead, as if training for an overhead barbell snatch. Overhead squats with a band allows for greater extension because the hands can move apart. This is helpful to achieve a good shoulder position that relates to lifting individual kettlebells, allowing for a natural rotation of the joints.
In the images below is someone with a stiff thoracic spine overhead squatting with a band. Note the differences in the arm positions when using the band and the walking stick.
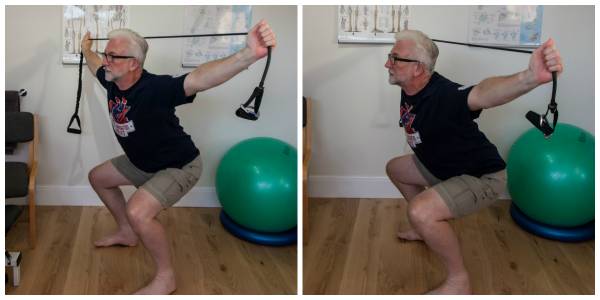
As you can see in the pictures with the rigid stick, the stick forces the shoulders forward and indicates poor thoracic extension. It also indicates the differences between each side. This is your gauge for improvement, because the wrist, elbow, and shoulder rotation is fixed and the thorax now has to do all the movement.
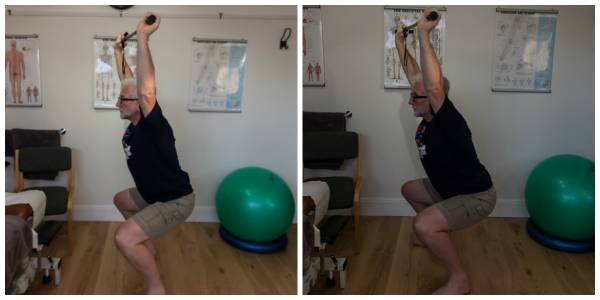
To increase thoracic mobility, repeat the movements on a regular basis and monitor the changes. Regular practice of the overhead squat will increase thoracic extension and shoulder mobility.
- Stand with a band or bar as overhead as you can.
- Go into the squat as far as you can while sustaining the overhead position.
- Pause, then depress your shoulder blades, squeeze the rhomboids, and deepen the squat.
- Hold for 10 seconds.
- Come back to the start position.
- Repeat for ten repetitions.
- Depending on where I am in my training, recovery, or competition programming will dictate the degree of depth I go into the squat and how far back I hold the bar. What I am looking for is achieving as natural an overhead arm position as I can, but not at the expense of injury to the cuff.
Practical Aids for Shoulder Mobility
Lastly, incorporate a foam roller or trigger ball into your shoulder mobility routine. Both tools are easy to use while watching TV, or when warming up or cooling down.
The Trigger Point Ball
Method 1:
- Stand with your back to a wall.
- Place the trigger ball on the wall between your shoulder blades.
- Lean firmly on the ball so that it presses into the rhomboids.
- Move the ball until you find the tight areas within the muscles.
- Hold that posture for 20-30 seconds or until the tenderness subsides.
- Work both sides of the spine and into the blade muscles also.
This exercise may take five to ten minutes, depending on how many trigger areas you find.
Method 2:
Essentially the same but lying face up on the floor with the ball underneath you in the same positions. Some people use a double-ball taped together to do both sides of the spine together, but they aren’t much use elsewhere on the body and in my opinion lack the precision of a single ball. As a note, a weighted plate on the front of the shoulder or chest is also of little value. Crushing the nerve fibres with extra pressure is damaging and likely to irritate them further.
The Foam Roller
- Lie on the floor face up with the roller under your lower back to begin.
- Bend both knees so both feet are firmly on the floor.
- Start to move your body over the roller. I like a rhythmical up and down the spine over a short distance but ‘climbing’ up the spine.
- Once you reach the thoracic spine, start to arch gently over the roller.
- Start to raise your arms so that they are eventually overhead/parallel with the floor if you can manage it.
- Tender area? Pause or back off a little and then relax further over the roller.
- Gradually work up to the junction with the neck, pausing at each segment of the spine as you go.
- Breathe out as you relax over the roller, in as you move up so as to maintain tension. I’m not personally a fan of the knobbly rollers for the legs or lower back, but they may have a place for the thoracic spine.
Make Your Shoulders Your Top Priority
Shoulder mobility is a very wide ranging topic and I could go on for some time, but I hope that this article will give you a little insight. Scapular mobility, ACJ range of motion, and relaxation of all the muscles around the joint are the key messages to take home. That, and spend a little more time stretching and mobilizing alongside your sports lifting. Age may just be a number, but it is a number that must be shown respect. Upper limb problems overall are very common indeed and we all love our sport, but we need them for our day to day activities even more.
Whatever technique you adopt, the process of change can take a very long time. Don’t expect anything less than three months of regular practice to bring substantive change to your shoulder mobility. We all need to be spending time concentrating on movement and mobility at least as much as we do on fitness, but if you only have time to deal with one area, please make it the complex and beautiful shoulder mechanism. That is not permission to ignore the rest, but for longevity in movement and health, taking care of the shoulders may just be the most important priority.
This article was originally published on Breaking Muscle UK.